How to Find Out if Your Windows are Rotted

How to Find Out if Your Windows are Rotted While wooden windows look very nice, they are at risk for problems. One of the main issues is that they can rot very easily. This is especially true for homes that are located where there is a lot of rain and humidity. Water and moisture can easily get into the cracks and, if your windows were not installed properly, can sit there on the wood leaving them at risk for rotting. Unfortunately, many homeowners are not even aware that their windows are rotting until something major happens. For this reason, it is important to check them at least once a year.

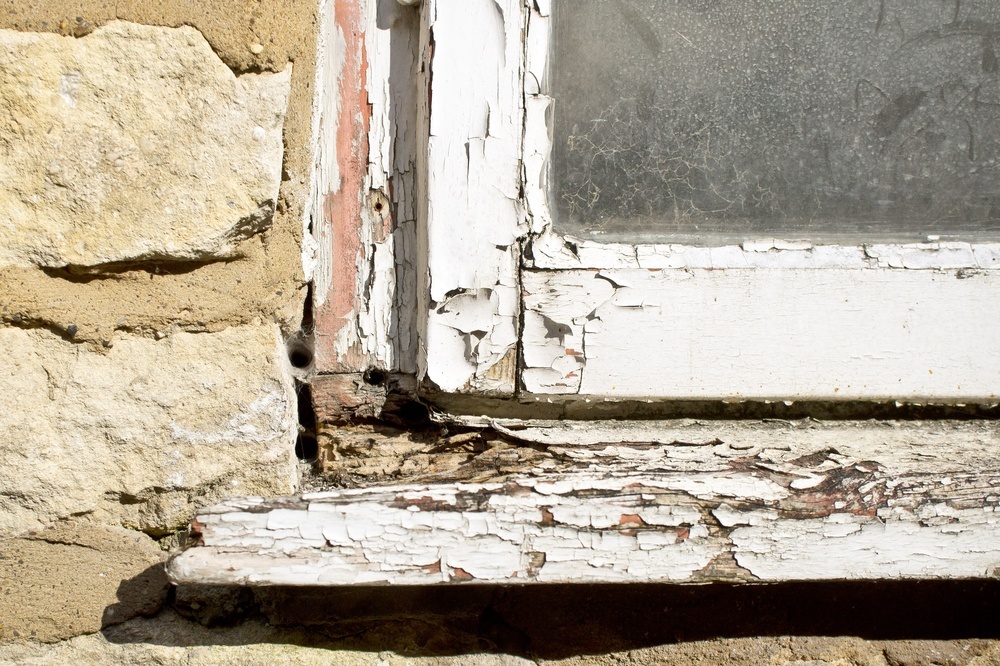
The first thing you want to do is visibly inspect the windows. If you see any paint that appears wavy or bubbled, it could be a sign of rot. You may also notice that some of the wood appears to have bowed out and is no longer flush. When water gets into the wood, it will cause the wood to swell and warp. These are definitely signs that your windows have a problem.

After a visual inspection, get a small, sharp knife or a metal skewer type tool. Start by poking the knife or metal skewer into the wood where you suspect that it might be rotting. If the wood feels spongy and soft, see how far you can push the tool in. You can tell the extent of the rot by how far you can actually push the tool into the wood. If the rot extends deep, you will need to do some major repairs.

If the rot around your windows is minimal, you may be able to repair it with wood epoxy. The rot will have to be removed first so that it can be replaced with the epoxy. This will harden up and once it is painted, no one will ever notice that there was a problem. If the window sill is completely rotten, you may wish to replace the boards so that it does not spread to your windows themselves. Most people often find that installing vinyl replacement windows is the best solution or them. These replacement windows are affordable and you will no longer have to worry about the windows rotting out. You will still need to check the area surrounding the windows, but your windows will be safe from rot in the future. It is often the simplest solution. Even if you repair the damage on your wooden windows or replace your rotted windows with new wooden windows, you’re still at risk of more rot a few years down the road.

How to Maintain Your Water Heater

How to Maintain Your Water Heater Whether you realize it or not, your water heater is one of the most important appliances in your home. When it’s working properly, you might forget it’s even there. But If your water heater isn’t working right, you’ll know it right away.

Regular maintenance of your home’s water heater will not only help prevent costly problems, but it can also help extend the life of your water heater. There are several things you need to do to maintain your water heater.

Lower Your Water Heater's Temperature

The default temperature setting on most new water heaters is 130 degrees Fahrenheit. However, you should consider keeping the temperature between 115 and 120 degrees Fahrenheit. Lowering the temperature on your water heater has a number of benefits. Your water heater will not have to work as hard and will reduce the risk of you getting burned by hot water. Furthermore, reducing the temperature on your water heater can help you save money on your energy bill.

Flush Your Water Heater

Sediment has a tendency to build up in your water heater over time, cause corrosion, and can also reduce the efficiency of your water heater. That is why it is important to flush your water heater on a regular basis. The acidity and hardness of the water in your area will determine how often you need to flush the water heater.

Before you begin to flush your water heater, turn off the power first. Place a bucket underneath the drain valve and turn the drain valve counterclockwise. Empty one to two gallons of water, then turn the drain valve off by turning it clockwise. When you’re done, turn the power back on again.

Use An Insulated Blanket

Wrapping an insulated blanket around the water heater to help extend the life of your water heater by reducing the demand on it. It also helps reduce energy consumption since it doesn’t have to work as hard to heat your water.

Professional Maintenance Your water heater should receive professional maintenance at least once a year. A professional will thoroughly inspect all of the parts of your water heater and make repairs if necessary. It’s always better to address a small problem while it’s still a small problem, rather than after it becomes a much larger issue.

Managing Your Home Remodel Budget

Managing Your Home Remodel Budget You don’t have to be a long-time homeowner to know that home renovation projects can be very expensive. It can take a long time to save up the money you need and even then, it’s still entirely possible it will end up costing you more than you expected.

After years of saving money to remodel your home, the last thing you want is to run out of money when the remodel is not even close to half way finished. Unfortunately, this happens to a lot of people. They either underestimate the cost of the remodel or they overspend somewhere along the line. For a successful remodel, you need to learn how to manage the budget you have set for it. The following are a few tips that will help you stay on track and see your project through to conclusion.

Be Realistic

Many homeowners often do not set realistic budgets for their home remodel. While we all wish we could spend less, there are certain costs that you are going to have and you can’t make them go away. Your budget has to be realistic or you will run the risk of running out of money before the work is done. Don’t try to cut corners by skipping out on things like permits and licensed contractors. You may spend less money upfront, but it’s entirely likely it will cost you more in the long run.

Plan for the Unknown

When doing a remodel, there is always the risk that something is going to come up that wasn’t planned on. Sometimes, a contractor will discover a problem after they start working that they couldn’t possibly have known about when they came out to give an estimate. It could be that your windows have all rotted out and you hadn’t planned on the cost of vinyl replacement windows. By planning for the unknown and setting a certain amount of contingency money aside, you will be prepared and can still stick to your budget.

Estimates

If you are hiring a contractor to do the remodel, be sure that you shop around to get estimates. While there is more to picking a contractor than the estimate he or she provides, it will give you a better idea of the costs involved. Also, be sure that hire a contractor that is licensed and insured. The last thing you want is to give money to someone who is going to run out on you before the job is complete. If a contractor gives you an estimate you like, don’t forget to look for reviews online.

Stick to Your Plan Once you have planned your remodel, try to stick to the plan. Changing something half way through the remodel is going to cost you more money. For example, if you change the design of your bathroom after it is half done, you may be paying more in material and labor costs. Sticking to your plans will help to ensure that you stay on budget.

Saving Money With New Windows

Saving Money With New Windows During the winter months, older windows can make a home cold and susceptible to drafts, which can drive up heating costs. Once the spring arrives and temperatures start to rise, your energy costs will still be higher since the cool air produced by your air conditioner can escape through the cracks.

Replacing your windows with new vinyl windows is an extremely effective method of making sure your home is as energy efficient as possible. It’s true that having vinyl replacement windows installed will cost you some money upfront, but the long-term savings on energy bills can be amazing.

Why the Interest in Vinyl Windows?

Consumers are constantly opening their utility bills and being surprised by fluctuations in price. To cut down on the shock of looking at their bills, more homeowners than ever before are looking for ways to prevent that from happening. Vinyl windows are an attractive option because of their insulating capabilities and durability. In regards to their ability to withstand even the most extreme weather conditions, vinyl windows are becoming the preferred window replacement solution for property owners. Vinyl windows have a lower amount of heat loss when compared to steel or aluminum windows.

Getting More From Your Window Upgrade

In some cases, an energy tax credit may be available for those who make the switch to more energy efficient windows. In these cases, some or all of the windows in a home can qualify one for a tax credit. Eligible households can receive a 10% reduction in tax costs for their window replacements. The maximum limit for the deduction is $500.

Where to Start Replacing Windows

If you only want to replace windows in one area of your home at a time, consider where you spend the most time so that the most commonly used areas of the home will be more comfortable. But if you have rooms that are the colder than others or have the oldest windows in the house, those would also be good places to start so you can help keep those rooms warmer and get rid of the oldest and least efficient windows first. Upgrading windows in your home can lower heating and cooling costs as seasons change. Vinyl windows can also give the home a refreshed, updated appearance. Investing in new windows translates into instant energy savings for those looking to lower heating or cooling costs.

Preventing Frozen Pipes

Preventing Frozen Pipes Frozen pipes are one of the most common winter plumbing problems. If you live in a climate where the temperature often drops below zero, there’s a good chance your pipes will freeze. Fortunately, frozen pipes can be prevented. Follow these tips to keep your water running smoothly all winter long.

Insulate Your Pipes

One of the best things you can do to prevent your pipes from freezing is to insulate them. Insulation helps prevent pipes from freezing by slowing down the rate of heat transfer. Make sure that you know where the main shut off valve is at. Leaks can occur once a frozen pipe thaws.

Let The Faucets Drip

If the temperature is about to dip below freezing, let the faucets drip just a little bit. Having a small amount of water running through the pipes can prevent them from freezing up.

Keep The Thermostat at an Appropriate Temperature

You should keep the temperature on your thermostat at 68 degrees Fahrenheit. You should also open up your cabinets in order to allow the heat to flow to the pipes.

Many people like to lower the temperature on their thermostat at night. If this is a regular habit of yours, you might want to take a break from it during the colder months. Although it’s a great way to save energy, it’s best to keep the thermostat on the same temperature day and night during the colder months. Your pipes are more likely to burst if the temperature in your home keeps fluctuating. Furthermore, if you will be leaving your home for an extended period of time, then you will need to set the temperature on the thermostat to at least 55 degrees Fahrenheit.

What Should I Do If My Pipes Get Frozen?

There are quite a few things you can do if your pipes get frozen. You can thaw your pipes by applying heat to them. A portable space heater or hair dryer are examples of some of the things you can use to thaw your pipes. Do not use a propane heater, blow torch or charcoal stove. You should also keep the faucet open. Once the ice starts to melt, the water will start to flow through the faucet. If you are unable to thaw the pipes yourself, then you should contact a plumber.